


Losing an important Excel file rarely comes with any warning. One simple power failure or crashed Excel app, and hours of entries, formulas, and formatting can vanish in a single second. Sometimes, the spreadsheet disappears due to manual actions, such as accidentally deleting it permanently.
You might think your data is gone at that point. That is usually not the case. Excel, as well as Windows and macOS, has mechanisms in place to bring that spreadsheet back, no matter how it went missing. This guide will show you how to recover an Excel spreadsheet with these inbuilt options.
How to Recover an Unsaved Excel Spreadsheet
When Excel crashes or you close a file without saving it, your work is usually not lost. Excel keeps temporary copies of a workbook while you are still typing in it and your Windows or Mac computer also creates temporary copies.
So here are three ways to find these temporary copies and recover an unsaved Excel file.
Way 1. Use the Recover Unsaved Workbooks Feature
Excel 2010 and later versions have a built-in AutoRecover feature. It saves temporary copies of your work at set intervals. Then it drops them into a hidden folder. So this feature can help when Excel closes unexpectedly.
When you try to reopen the Excel file, it will automatically show the Document Recovery pane on the left side of your screen, listing all Excel files saved up to that point, with timestamps. You can check the most recent ones to find the unsaved Excel file.
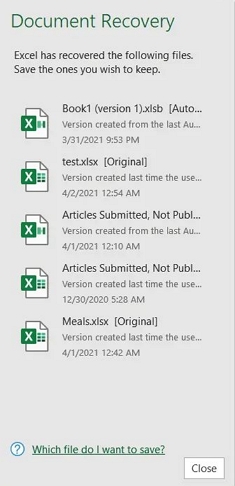
Whether an auto-saved copy exists depends on timing. Excel will usually save one every ten minutes by default. So if your workbook was only open for five minutes, there may be nothing behind it. Also, Microsoft usually clears these drafts after four days. By next week, your chances are much slimmer.
However, if you deliberately picked Don't Save while closing Excel, the pane will not appear at all.
Way 2. Through the UnsavedFiles Folder
If the Recover Unsaved Workbooks button does not show your spreadsheet, you can check the UnsavedFiles folder of Excel or Office manually. Many users have noted that it can help find a recovery copy even when Excel doesn't list it in the menu.
Option 1. Recover Unsaved Excel File from Office UnsavedFiles Folder
Step 1. Copy the path for your operating system
- Windows – Microsoft 365, Excel 2016–2024: C:\Users\<YourUsername>\AppData\Local\Microsoft\Office\UnsavedFiles
- Mac – Microsoft 365: /Users/<YourUsername>/Library/Containers/com.microsoft.Excel/Data/Library/Application Support/Microsoft
Step 2. Open the UnsavedFiles folder
- On Windows: Open File Explorer. Click the address bar and paste the copied path there. Then, press Enter.
- On Mac: Open Finder. Click Go > Go to Folder. Paste the path and press Enter.
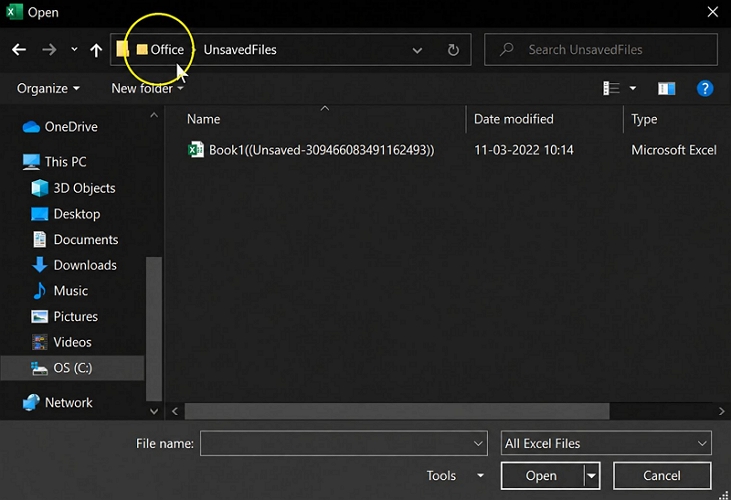
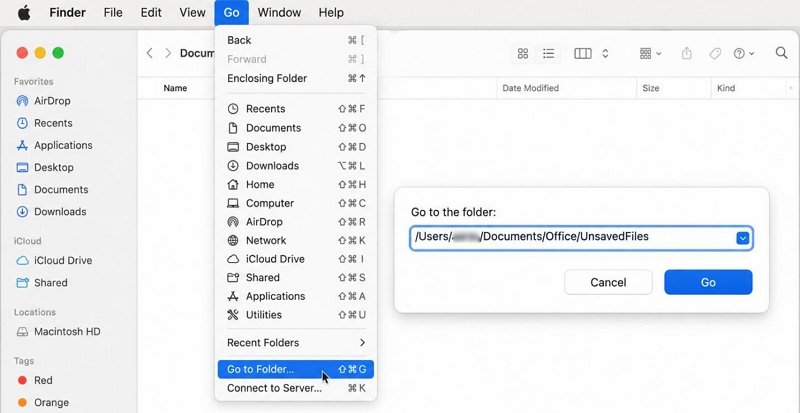
Step 3. Look for a file created or modified around the time you lost your work. The names will not help you much. So use the date and time to identify the most likely copy.
Step 4. Open the file in Excel. If it contains your missing work, click File > Save As. Save it with a new name in a normal folder.
Option 2. Recover Workbook from Excel UnsavedFiles Folder
If you don’t see the version you want in Excel’s recovery pane on the left, you can try looking for it in the related folder where more files were saved.
- Open Excel. Click the File tab and click Open.
- Select Recent.
- Scroll all the way to the bottom of the recent files list. Click Recover Unsaved Workbooks.
- Excel opens a Windows File Explorer window or a Finder window on Mac. This is the hidden temp folder where Excel saves unsaved files.
- Click the Date Modified column to sort the newest file to the top.
- Pick the file with the timestamp closest to when you lost your work.
- Click Open.
- Check the sheet. If Excel saved it, all your content should be there. Otherwise, it is not. So this is more of a hit-or-miss method.
- Still, if you’ve found the worksheet, click the File menu, then hit Save As. Then, pick a folder and save the sheet with a proper name.

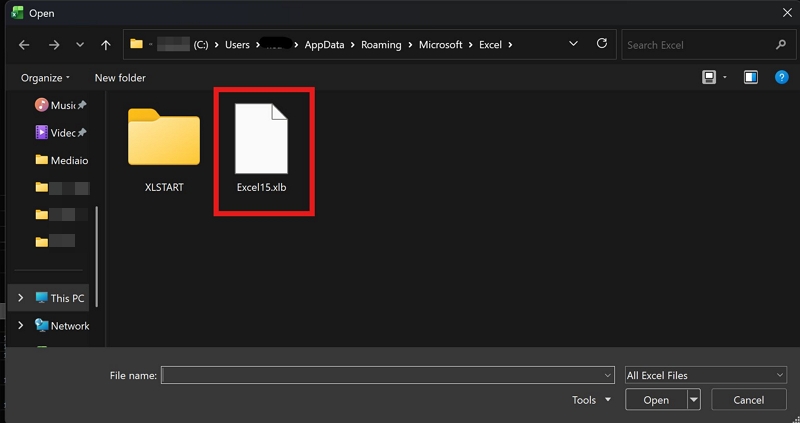

Way 3. Via the Windows Temp Folder
If you cannot find the spreadsheet with Excel's Recover Unsaved Workbooks feature or in the UnsavedFiles folder. You can try one more place: the Windows Temp folder. Excel will create temporary files while you work on your computer.
On Windows
Step 1. Open File Explorer.
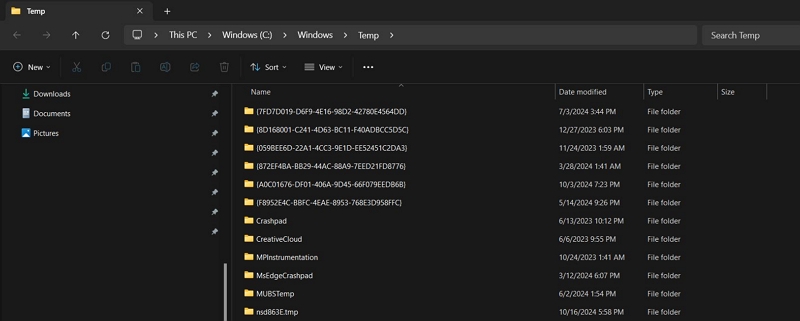
Step 2. Click the address bar, type %temp% and press Enter. Windows will then open your Temp folder. It usually lives at C:\Users\YourUsername\AppData\Local\Temp.
Note: Here, Excel files will not end with .xlsx. Instead, you will see files with .tmp extensions.
You can narrow it down by sorting the files by the Date Modified category. Then, look for files modified around the time Excel crashed or your computer shut down unexpectedly.
Step 3. If you find a .tmp file created around the time of the crash, do not touch the original. Copy it to another location first — your Desktop, for example. This way, you keep the original temporary file safe if the recovery fails.
Step 4. Right-click the copied file. Choose Rename, change the .tmp extension to .xlsx. For example, if the file is abc123.tmp, rename it to abc123.xlsx. This can sometimes open the unsaved Excel file.
On Mac
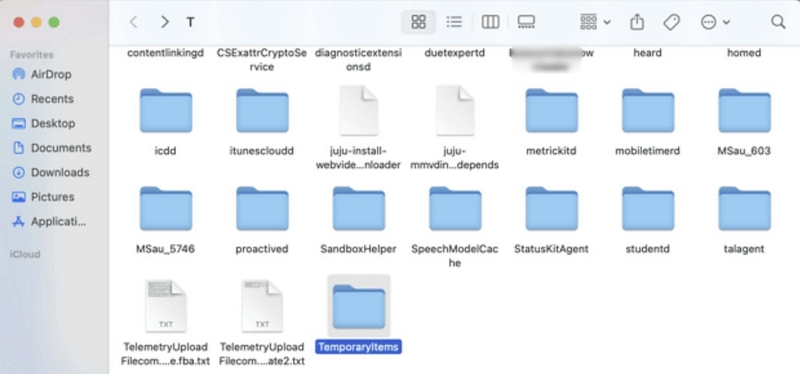
Step 1. Open Terminal, type $TMPDIR and press Enter.

Step 2. Finder will open the temporary directory for your current user session. Look for a folder named Temporary Items. Check for a file beginning with ~ and labeled something like Excel Work File.
Step 3. If you find a file that matches the time when Excel crashed, copy it to your Desktop or another safe location. Try opening the copy with Excel. If necessary, change the extension to .xlsx there as well.
How to Recover a Deleted Excel Spreadsheet
Recovering a deleted spreadsheet is different from recovering an unsaved workbook. So the above methods will not help you.
Instead, you’ll have to look at different locations. For instance:
- When you’ve deleted an Excel file from computer storage, Windows or macOS usually moves it to the Recycle Bin or Trash folder.
- And if your Excel files are linked to a OneDrive synced folder, the cloud recycle bin could be holding your spreadsheet.
One more thing is worth knowing. Even when all these options are exhausted, a file deleted from your computer is usually not really deleted. Windows or macOS simply removes its reference from the file system. That is why we will also introduce you to the Eassiy Data Recovery program, which can access the storage sectors on your hard drive where the deleted Excel file could still be present and lets you restore it.
Here is how each method works.
Way 1. Restore Excel from Trash
Many users overlook this, but a deleted spreadsheet is often still sitting in the Recycle Bin, completely untouched. Windows simply keeps deleted files there until you empty it. On macOS, the same applies unless you have the auto-removal setting switched on after thirty days.
So let us look at how to check each of these places.
From Windows Recycle Bin
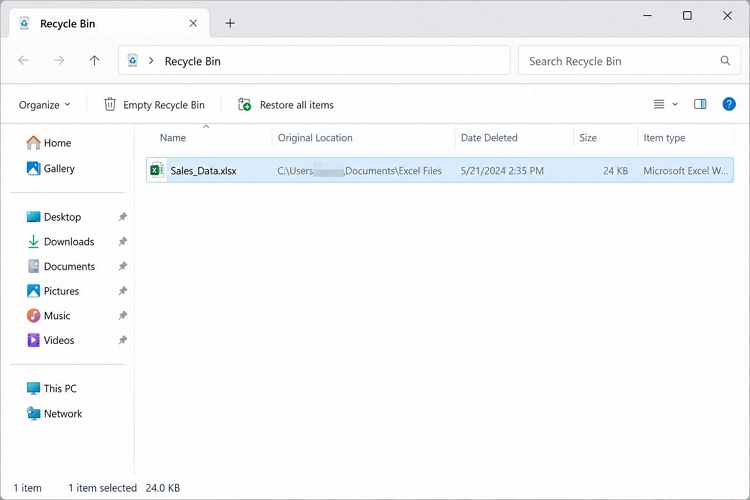
If you deleted the file normally and haven't emptied the Recycle Bin since, it will still be there. Here is how to bring it back.
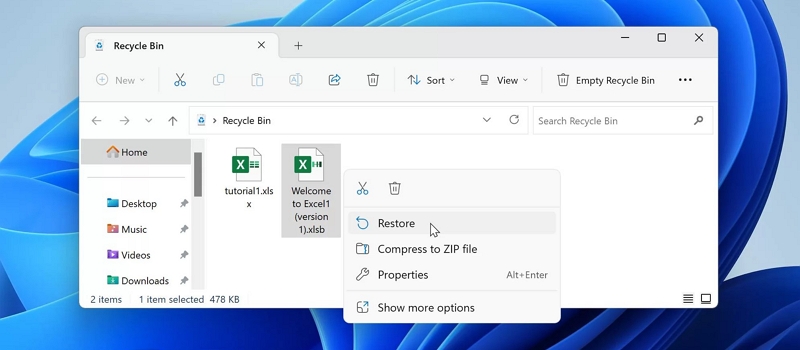
Step 1. Open the Recycle Bin.
Step 2. Look for the Excel file. If the list is long, sort by Date Deleted. You can even search for the workbook by name.
Step 3. Right-click the file and select Restore. When too many files look similar, you can restore all of them and check one by one.
Windows will return the spreadsheet to its original location.
Of course, none of this will work if you already emptied the bin or removed the file with Shift + Delete.
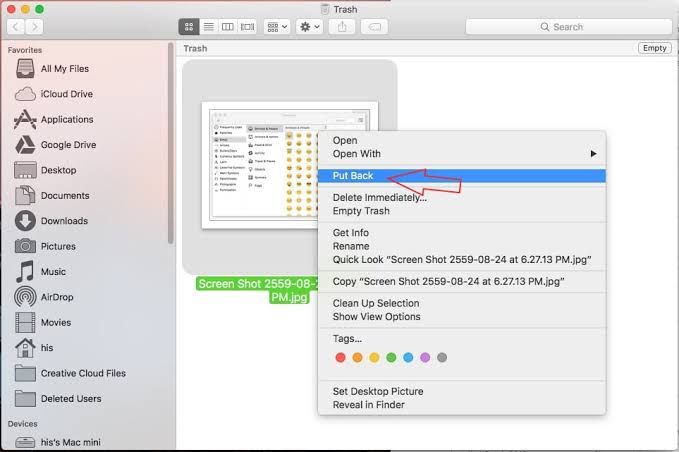
From Mac Trash
macOS uses Trash instead of Recycle Bin.
Step 1. Access Trash from the Dock.
Step 2. Find the deleted Excel spreadsheet.
Step 3. Right-click the file and select Put Back.
macOS will return the spreadsheet to its original folder.
From Recycle Bin of OneDrive or SharePoint
OneDrive personal accounts hold deleted files for thirty days. If you are on a work or school account, you can recover files deleted up to ninety-three days back.
Let's check all these corners and get your file back.
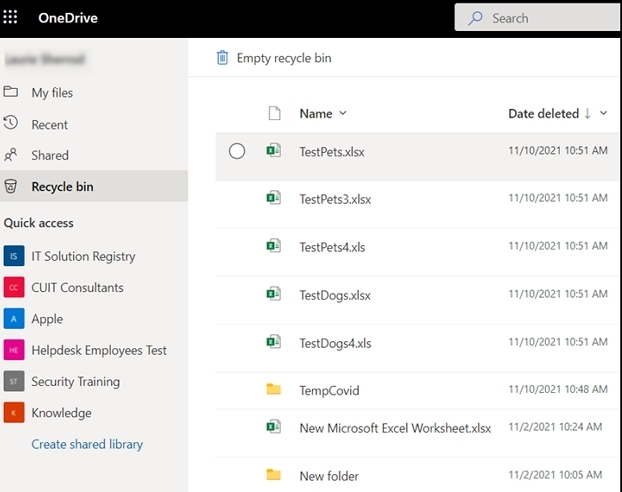
From OneDrive
When your Microsoft files are synced to OneDrive folders, you might have a second copy of that deletion sitting in their respective recycle bins. Here is how to rescue it from OneDrive.
Step 1. Sign in to your OneDrive account.
Step 2. Open the Recycle Bin.
Step 3. Find the deleted spreadsheet.
Step 4. Select it and choose Restore.
The restored file will return to its previous OneDrive location.
From SharePoint
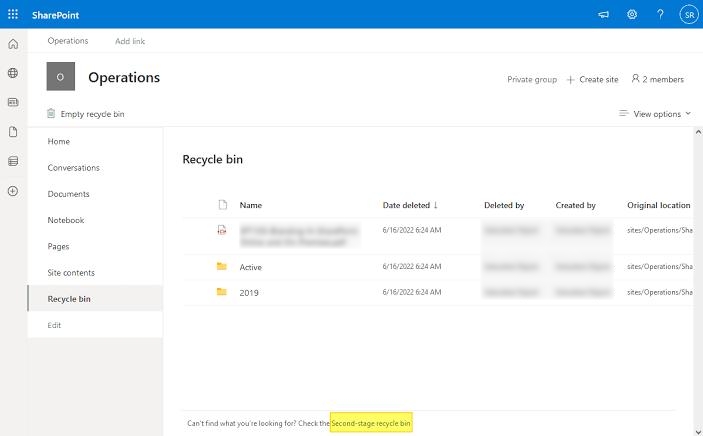
If the spreadsheet was stored in a SharePoint document library, head to the relevant SharePoint site and check its recycle bin instead.
SharePoint will retain deleted files in a two-stage recycle bin. Your file will normally appear in the first stage, which any site member can restore from. But even if somebody has emptied that first-stage bin, the file could still be sitting in the second-stage bin for up to 93 days. So ask your administrator to restore the deleted Excel file from there and share it with you.
Way 2. Retrieve Excel via Backup
Both Windows and macOS come with built-in backup systems that work offline. So let us see whether you have such a backup sitting in place, and how to recover your deleted Excel file from it.
On Windows
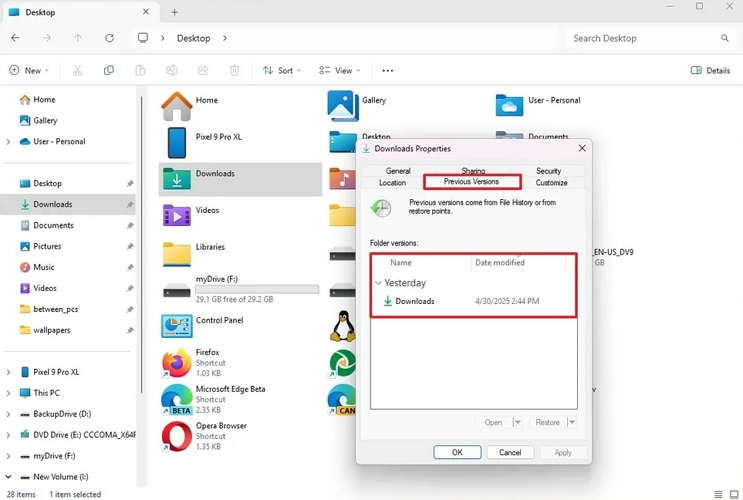
Windows keeps older versions of files and folders if File History or System Protection is enabled. This lets you go back to a point before the file was deleted in File Explorer and restore the deleted Excel file.
Step 1. Right-click the folder. Select Properties.
Step 2. Look for thePrevious Versions tab.
Note: If the Previous Versions tab is missing, those settings were never configured on your machine.
Step 3. You will see older copies of the folder listed by date and time. How far back these go depends entirely on your storage and your configured settings.
Step 4. Select the version from before you deleted the spreadsheet.
Step 5. Click Open to browse its contents. Find your Excel file and copy it to another location.
Note: Using the Restore option will replace the current file or folder with the selected previous version. So if you just need the deleted Excel file, use the Copy option and move it to a new folder.
On Mac
This route only works if you use Time Machine. The best thing about using Time Machine is that it holds daily backups for the past month, plus weekly backups going further back. So if you had this feature enabled, you can most probably get your Excel file back even if it was deleted months ago.
Here are the steps to follow.
Step 1. Open Finder. Go to the folder where the Excel file was originally stored.
Step 2. Launch Time Machine from the menu bar. You can also open it from Applications.
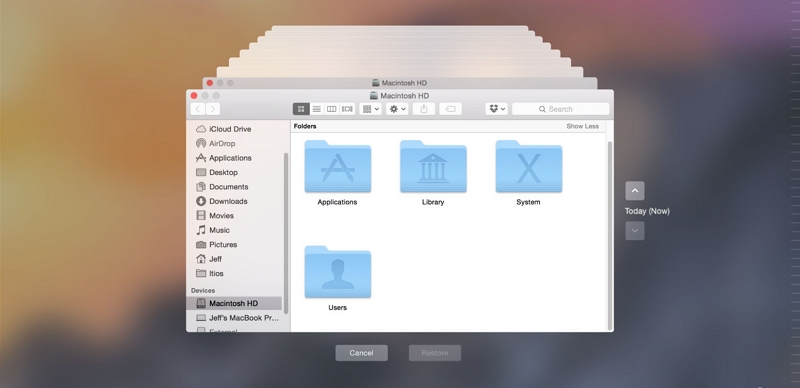
Step 3. Use the timeline along the edge of the screen to move back to a date when the spreadsheet was still present. Look for the deleted .xls or .xlsx file in its original folder.
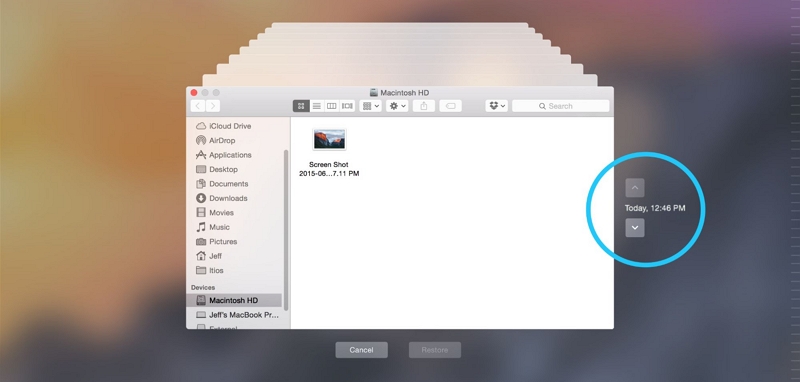
Step 4. Select the spreadsheet and click Restore.
Time Machine will restore that individual file to its original location. So you do not need to restore an entire backup just to get one workbook back.
Way 3. Recover Excel Using Eassiy Data Recovery
What if you deleted that Excel file permanently—even from the Recycle Bin or Trash and have no backup or online copy?
This is where Eassiy Data Recovery helps. It scans the hard drive where the Excel file was deleted and tries to recover it.
Eassiy can identify all Excel file types, including .xls, .xlsx, and .csv. Plus, it supports NTFS, exFAT, FAT32, and APFS file systems on Windows 7 through 11 and macOS 10.7 or later. So it doesn't matter whether you lost a .csv file or an .xlsx workbook, or whether it went missing from Windows or macOS. Eassiy can help you recover it even after permanent deletion with high success rate.
Steps to Retrieve an Excel File Without Backup
Step 1. Download and install Eassiy Data Recovery on your computer. Launch the program.
Step 2. Select the drive you want to scan. Eassiy will display all the storage devices it can identify on your computer, so pick the one the Excel file was deleted from.
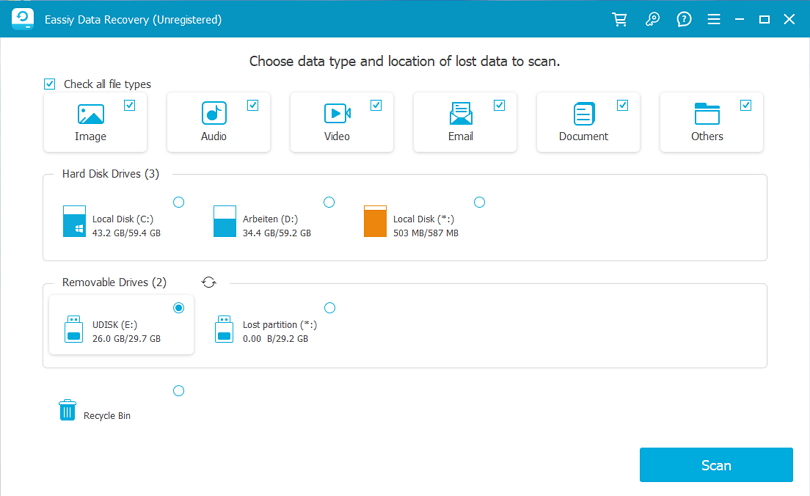
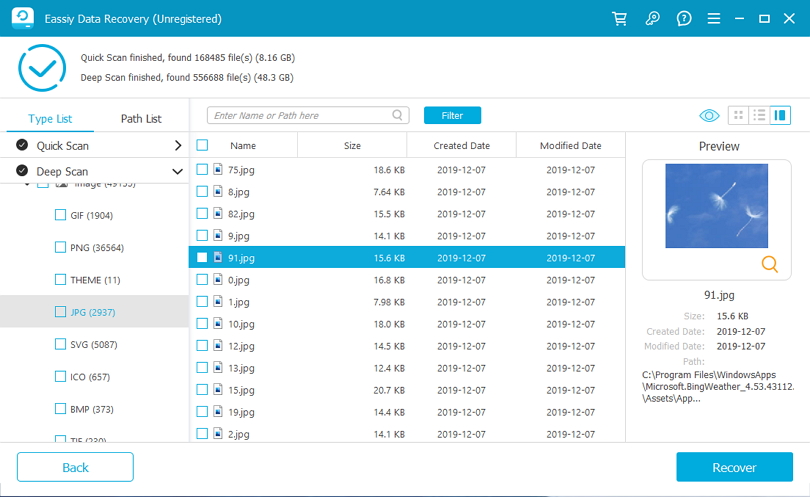
Step 3. Choose Scan. It will quickly read the file table on your storage sectors and show you recent deletions within minutes.
Note: If Quick Scan finds nothing, switch to Deep Scan. It reads the drive sector by sector and takes longer. However, it catches fragments and renamed files that Quick Scan can miss.
Step 4. Filter the results to Documents while the scan is still running, or type the workbook name into the search bar. Look for .xls, .xlsx, or .csv entries.
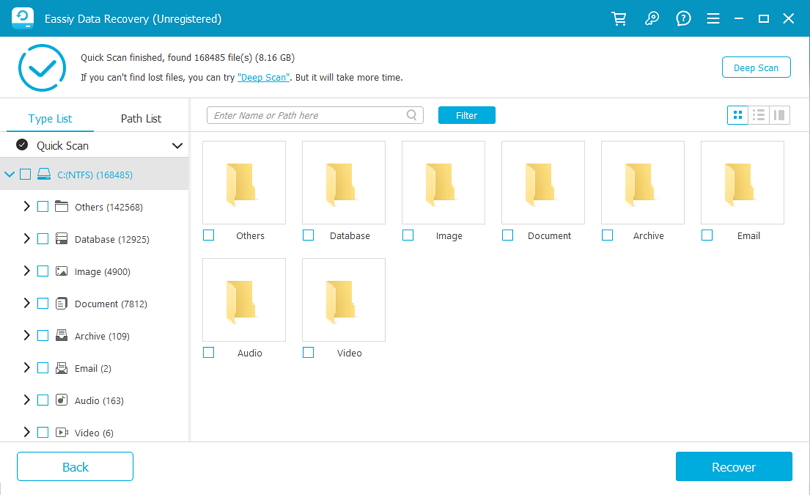
Step 5. Preview the file to make sure it is the right one. Then click Recover.
Step 6. Save it to the location you want.
Way 4. Get Back Excel with File Version
Sometimes your Excel file isn’t deleted, but its contents are wrong. For instance, you might have edited and deleted some important content of the Excel workbook a day ago. But now you realize you need it back.
Of course, the Undo button will not help you here. This is because the Undo action only stores 100 actions by default. Plus, Ctrl + Z (Undo) will not help you if you made the edit and closed it.
Version History solves this problem. It lets you view and restore earlier versions of files stored in OneDrive or SharePoint. One important condition applies: the workbook must be stored in one of these cloud locations. A workbook sitting on your desktop or a USB drive will show the Version History option greyed out, or not at all.
Here are the steps:
Step 1. Open the workbook and view its version history.
- Excel for Microsoft 365: Launch the workbook and select File. From there, pick Info, then Version History.
- Excel 2024, 2021, 2019, or 2016: Use File > History.
- Excel for Mac: The Microsoft 365 Mac workflow is File > Restore > Browse Version History.
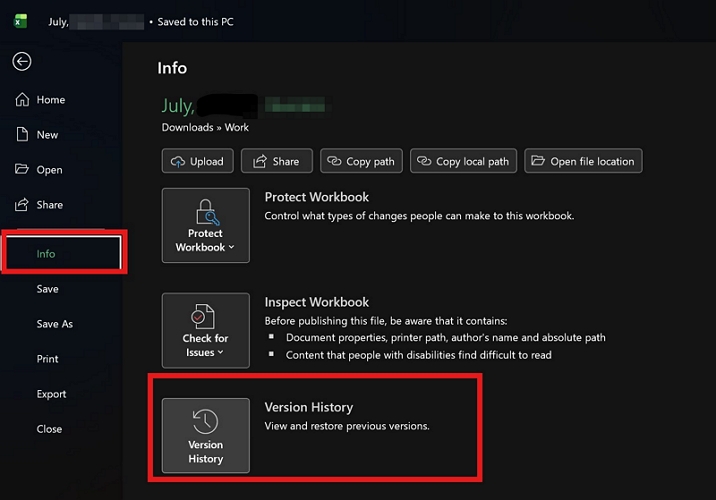
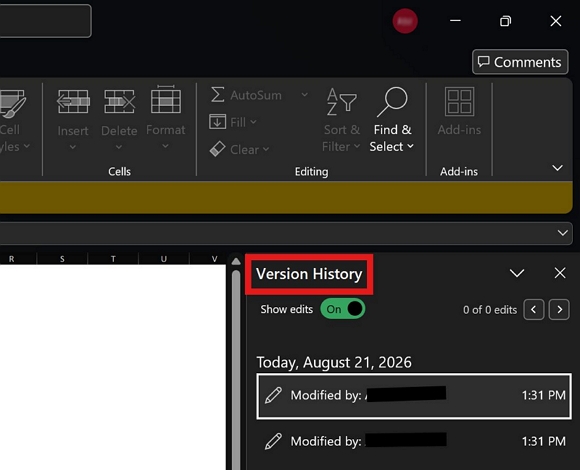
Step 2. Excel will display earlier versions listed by date and time. Select the version you want to open. Excel will open that version in a separate window so you can check its contents.
Depending on the file and your Microsoft 365 plan, the list also names who made each change.
Step 3. Select the older version you want and open it.
Note: How far back you can go depends on your account.
- Personal accounts hold the last 25 versions.
- Work and school accounts follow whatever limit your administrator set, and SharePoint libraries default to 500 major versions.
Step 4. Check whether it contains the information you need. If it does, click Restore to make that version the workbook's current version.
Or you can copy only what you need if you don’t want to roll back the whole file.
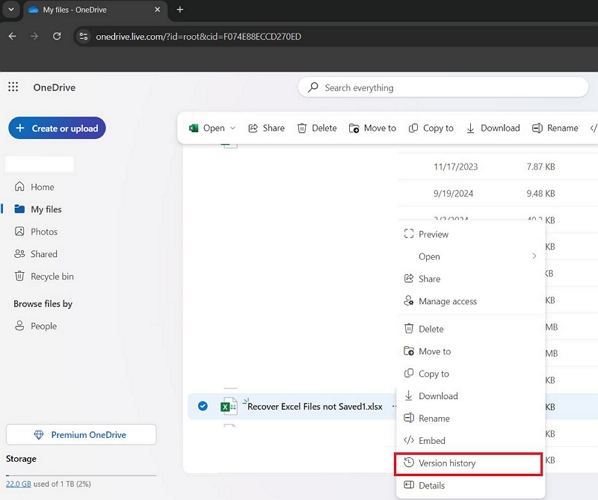
Alternatively, you can also right-click the file in OneDrive and select Version history.
How to Recover an Excel File That Says It Was Moved, Renamed, or Deleted
Sometimes when you try to open a previously used Excel workbook, Excel will show you the “Sorry, we couldn’t find [Filename]. Is it possible it was moved, renamed, or deleted?” error. For instance, this can happen when you:
- Open the file through File > Open > Recent.
- Open it from a OneDrive-synced folder.
- Click an Excel shortcut on your desktop that points to the file.
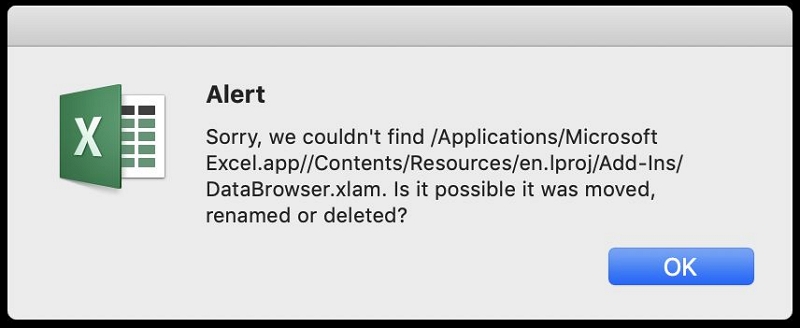
This error does not always mean your Excel file has been deleted. This usually shows up when Excel tries to open the workbook from its old location, but the file has been moved or renamed.
All you need to do is locate the original workbook. Here is how to find that and fix this error.
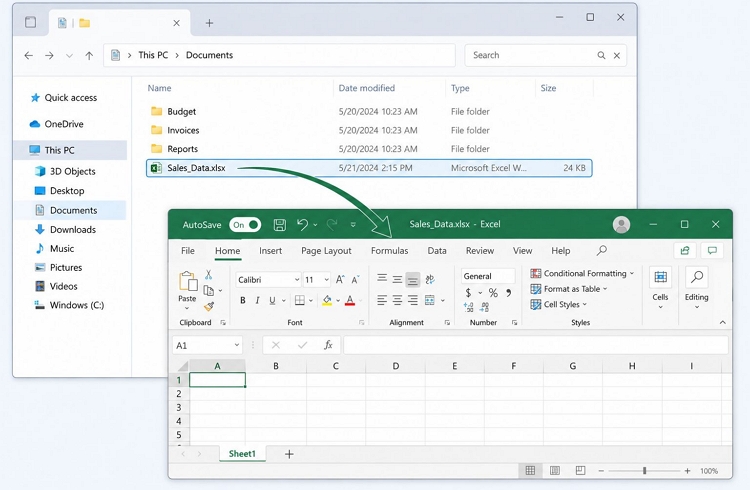
Fix 1. Find the Original Excel File via File Explorer
- Open File Explorer.
- Search for the original file name.
If you moved the Excel file, you will often find it sitting in another folder. You can launch it directly from there.
Fix 2. Open Excel File from OneDrive or SharePoint
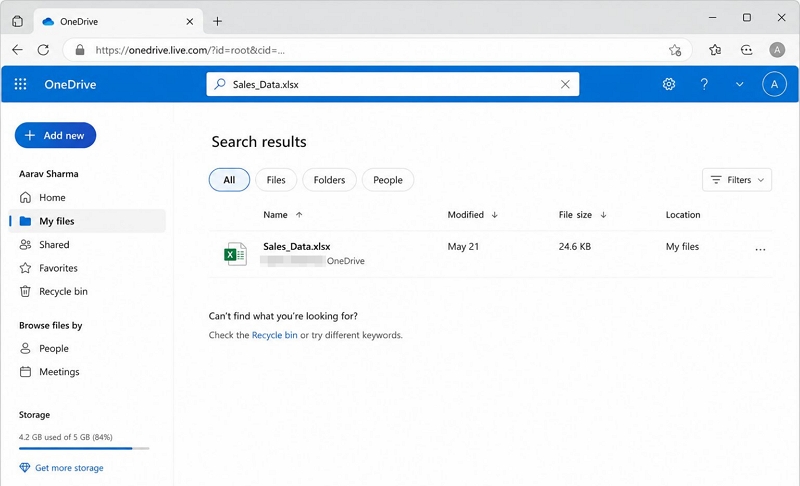
If you save your files in OneDrive or SharePoint, the local copy in the OneDrive-synced folder may be affected by a synchronization problem. When you try to open it, Excel will display the error. So, you can directly search for the file online.
- Pull up OneDrive.
- Search for the workbook.
- Open it directly from there.
Fix 3. Save the File to a Shorter Path
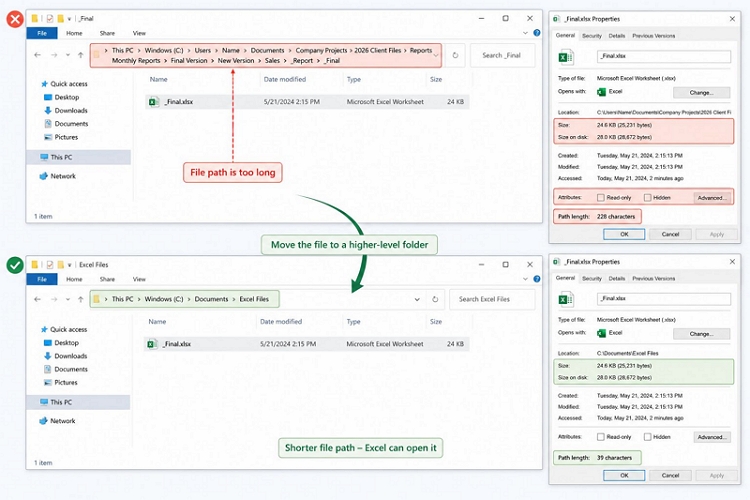
Excel can also struggle to open a workbook when its file path is too long. The file path usually includes the drive letter, every folder name, the file name, and its extension. However, Excel will cap that at 218 characters.
This can happen when a workbook is buried several folders deep. For example:
C:\Users\Name\Documents\Company Projects\2026 Client Files\Reports\Monthly Reports\Final Version\New Version\Sales_Report_Final.xlsx
So when you try to open it, Excel will show the error. Move the Excel file to a higher-level folder, such as: C:\Documents\Excel Files.
This way, the file will not be buried too deep and the file path is shorter. Then try opening it again. Excel will open the file this time.
Fix 4. Ensure the File Isn’t Deleted
Excel will also show this error if the file really has been deleted. So if the workbook isn't on your computer, OneDrive, or SharePoint, you may have deleted it. Then check every location we have covered so far:
- Windows Recycle Bin
- OneDrive Recycle Bin (and the SharePoint recycle bin)
- macOS Trash
- Previous Versions or File History on Windows
- Time Machine on Mac
If you find the file or an older copy, restore or copy it, and save it somewhere else.
Conclusion
Now you know how to recover your Excel file, whether it was lost to a power failure or an Excel crash, or whether you deleted it by accident.
And if all the recovery methods fail, you can use Eassiy Data Recovery. It scans the storage sectors where your file is sitting before and recovers it easily. Plus, it can bring back other data you might have lost: photos, videos, documents, and 1000+ file types.