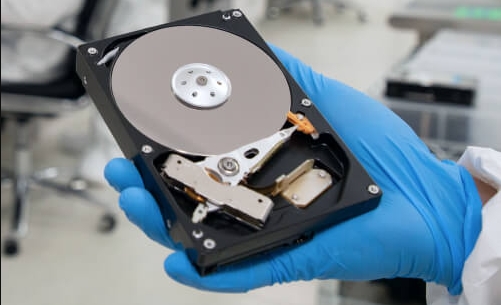


You plug your WD Elements drive into the USB port of your computer. The drive spins up, the tiny white LED flickers, but nothing shows up in File Explorer or Mac desktop. Stop right there! If Windows throws an alert stating "You need to format the disk in drive X: before you can use it" or you receive a similar prompt on Mac, hit Cancel immediately. This is because wiping the drive will make file recovery ten times harder than it needed to be.
Generally, if the drive doesn't take a nasty fall onto concrete or keep making a sharp, rhythmic clicking noise, the hardware is fine and your files are safe. Simply follow this guide to fix WD Elements external hard drive not showing up and access your data again.
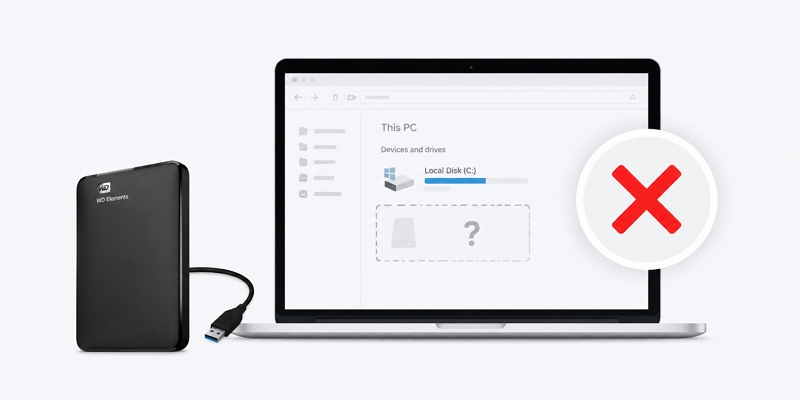
WD Elements External Hard Drive Not Showing Up: Reasons for Different Cases
External hard drives show health through physical cues, so watch how the drive behaves when you plug it in and do not touch software tools. Vibration, LED patterns, and OS sounds tell the story. Just pay attention to them. You will quickly learn if you face a minor drive letter mix-up or dead hardware.
Before Fixing WD Elements Drive Not Being Recognized
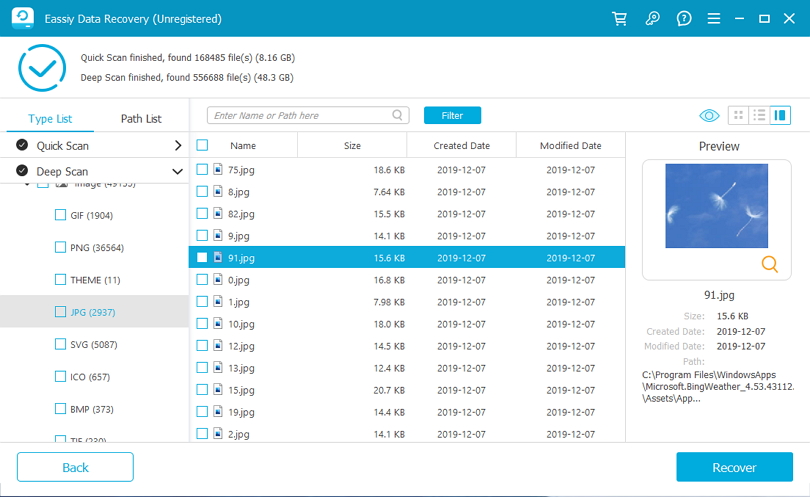
If the WD Elements drive is still detected by your computer but you cannot access the files, use a data recovery tool like Eassiy Data Recovery to scan the drive and save important files to another storage device. This can avoid unexpected data loss occurring during the fixing process. Eassiy can recover your images, videos, contacts, documents, etc., from your external hard drive on Windows or Mac. It recovers data with a 98.6% success rate, ensuring that you can get your precious data with the highest possibility. After a deep scan, you can select and preview the desired files and export them to another new external hard drive.
3 Steps to Recover Data from WD Elements External Hard Drive
Step 1. Download and install Eassiy Data Recovery on your computer.
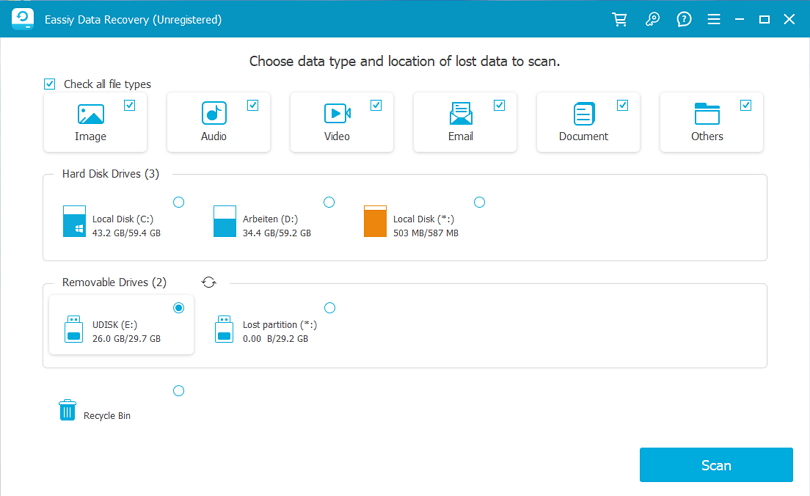
Step 2. Launch the software, choose the external hard drive, and select the types of data you want to recover. Then, click Scan.
Eassiy will quickly scan the drive and find the recoverable files for you. If you cannot find the desired data, run Deep Scan to search for more files.
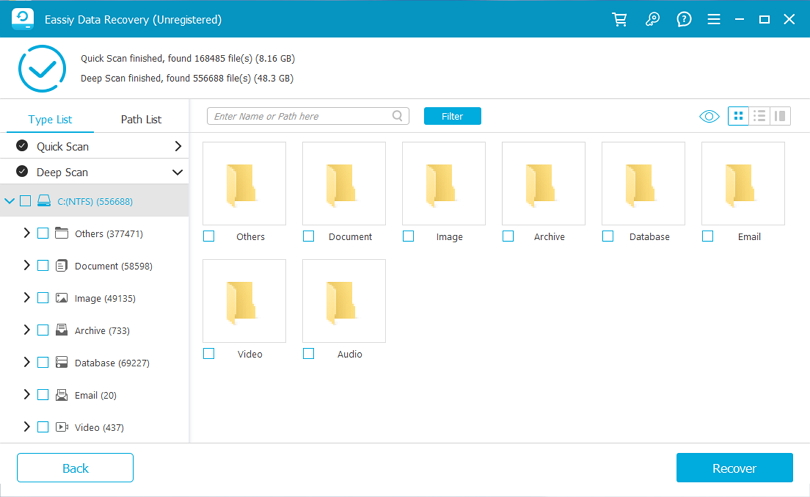
Step 3. Preview and select the data you need. Finally, click Recover and choose a different location(another external drive, hard drive, etc.,) to save the recovered files.
DIY Fixes for WD Elements Not Showing Up in Windows File Explorer
Your PC chimes when plugging in the drive, but nothing appears under This PC. You have a ghost drive whose actual volume isn't displayed in File Explorer. At that time, you can try the following fixes to make your external drive show again. No data loss will happen most of the time.
Fix 1: Reassign the Drive Letter
Windows needs drive letters for mount points. A system update or a new network drive can steal an assigned letter without warning. This hides your WD Elements drive instantly.
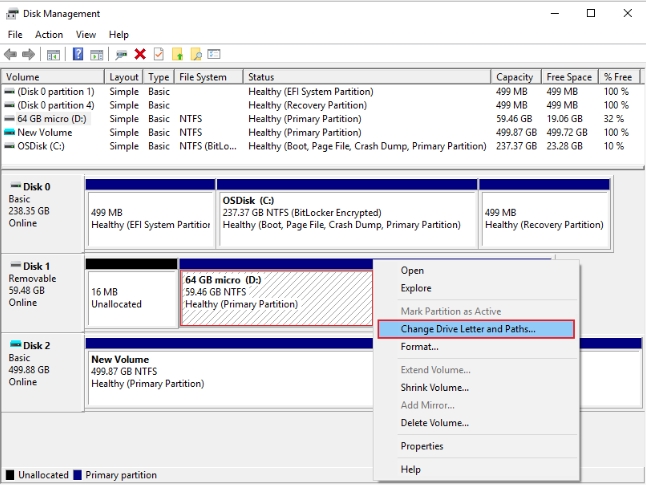
Step 1. Press Win + X and pick Disk Management. You can also type diskmgmt.msc in the Run box to access it.
Step 2. Scroll down through the lower pane to locate your drive. Then, look for a partition that lacks a drive letter and assign a new letter to it.
- Right-click the partition on your WD Elements drive.
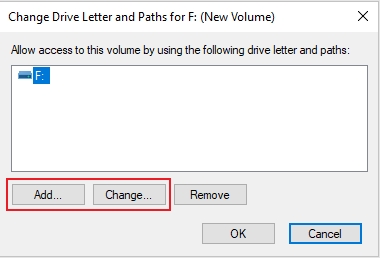
- Select Change Drive Letter and Paths...
- Click Add.
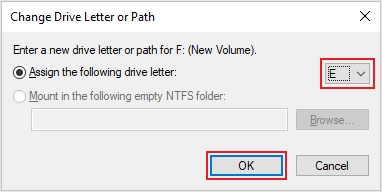
- Pick a letter near the end of the alphabet, like M: or X:.
- Click OK and confirm.
Fix 2: Reinstall Corrupted WD USB Drivers
USB drivers can become outdated or conflict with the system in several situations. For example, a major Windows update may replace or modify existing drivers. When this happens, Windows may not communicate properly with the external hard drive, causing it to disappear from File Explorer or show detection errors. You may also notice a yellow exclamation mark in Device Manager or receive error codes like Code 10 or Code 43. In such cases, reinstalling USB drivers is worth trying. It can refresh the connection and help Windows detect the external hard drive again.
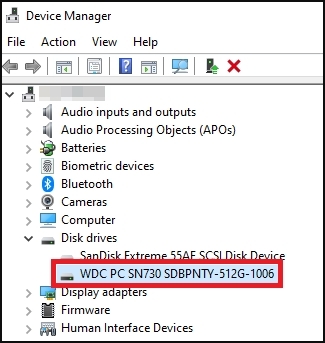
- Press Win + X and open Device Manager.
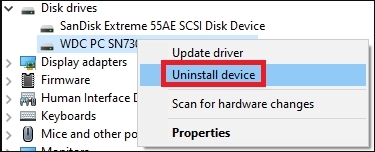
- Expand Disk drives. If your WD Elements Device shows a yellow warning triangle, right-click and choose Uninstall device.
- Click View in the top menu and check Show hidden devices.
- Expand Universal Serial Bus controllers.
- Find grayed-out USB Mass Storage Device entries or controllers showing Code 43 or Code 10 errors.
- Right-click all affected entries and hit Uninstall device.
- Unplug the drive and restart your PC. Once Windows reboots, plug the cable into a rear motherboard USB port. Windows will auto-install fresh drivers and then detect your WD Elements drive as normal.
Fix 3: Disable USB Selective Suspend
USB Selective Suspend may cause external hard drives to disconnect or fail to wake up properly after entering a low-power state. Disabling this feature keeps the USB port active and can help Windows detect the drive.
- Press Win + R, type control, and hit Enter for Control Panel.
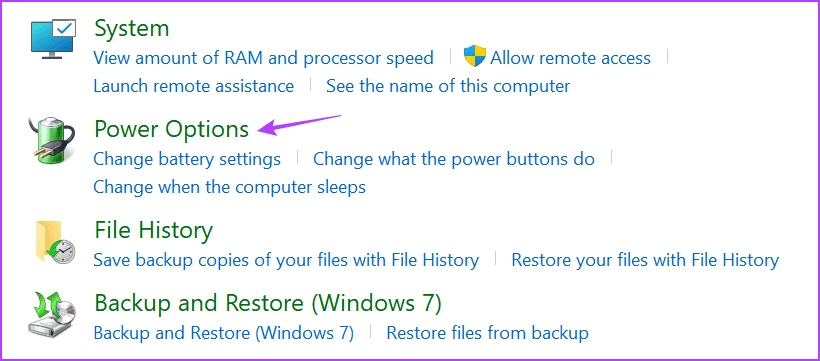
- Go to System and Security > Power Options.
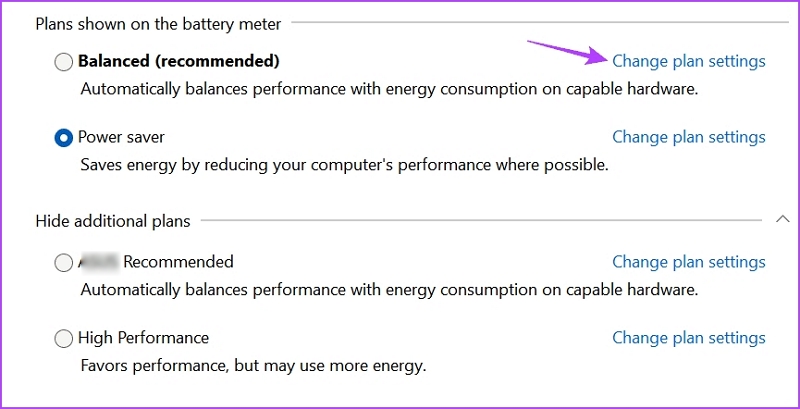
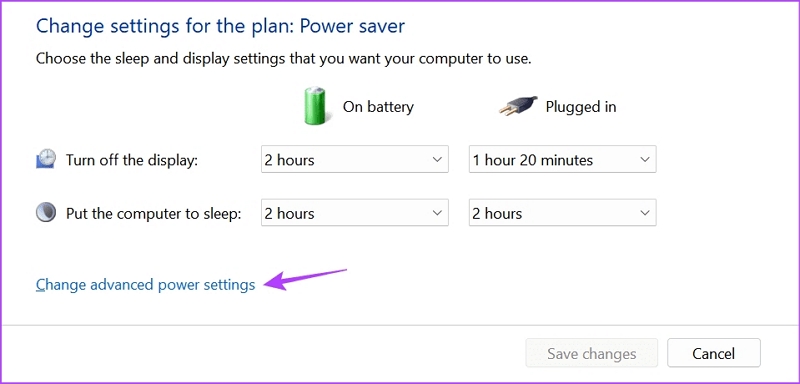
- Click Change plan settings beside your active plan.
- Select Change advanced power settings.
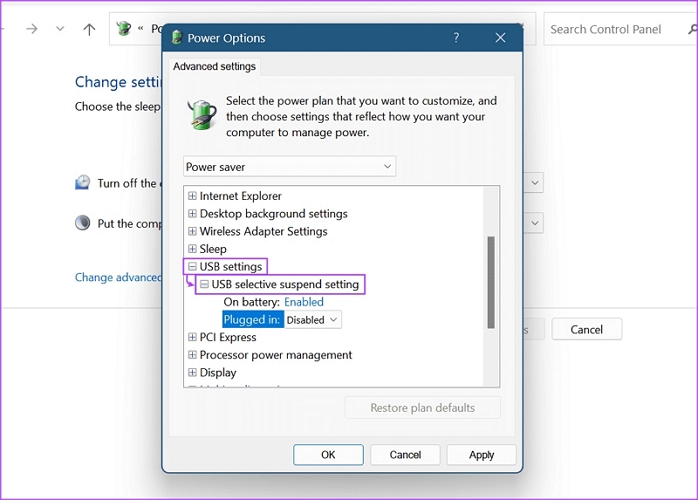
- Expand USB settings and open USB selective suspend setting.
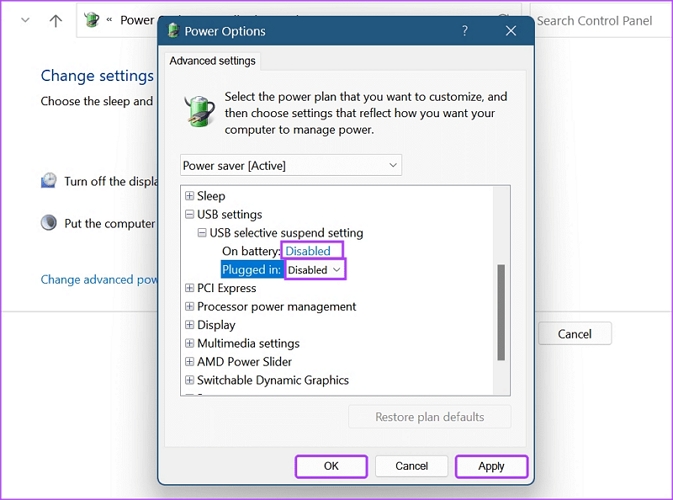
- Set both "On battery" and "Plugged in" options to Disabled.
- Click Apply and confirm with OK.
Fix 4: Disable WD Background Software
Have installed WD inbuilt tools on your computer? Then they could be the causes. WD background utilities may sometimes interfere with Windows drive mounting, especially when they are outdated or have compatibility issues with system updates. Tools like WD Discovery, WD Security, and older SmartWare versions could run background services that affect how Windows detects or accesses the external drive. These processes may delay drive mounting or prevent Windows from loading the partition properly in some cases.
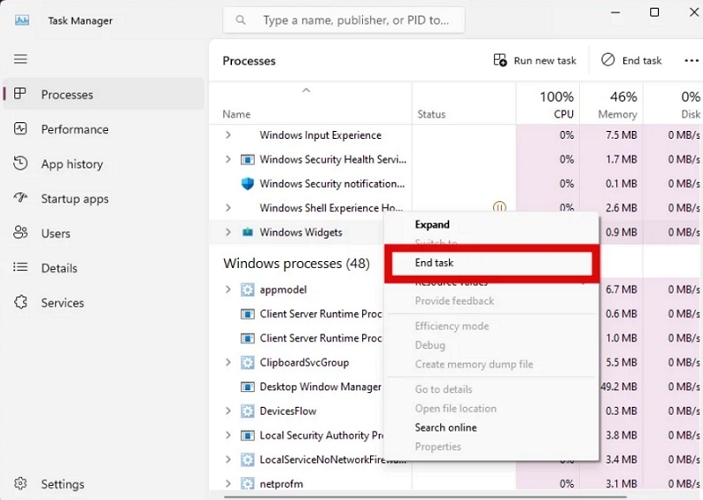
Step 1. Open Task Manager with Ctrl + Shift + Esc. Look for WDDriveService.exe or WD Discovery.exe.
Step 2. Kill those processes by selecting End task.
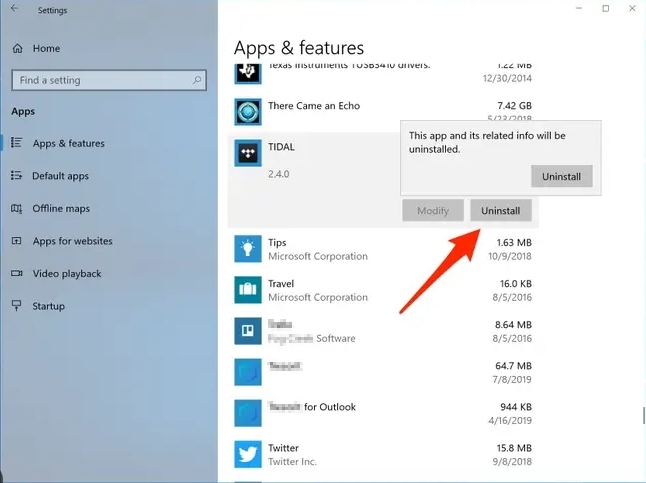
To prevent the issue from happening again, you can head over to Settings > Apps > Installed apps and uninstall WD software completely.
Fix 5: Detect and Repair File System Corruption with CHKDSK
If Disk Management assigns a drive letter but File Explorer freezes or displays "Location is not accessible", the file system may contain logical errors that prevent Windows from reading the WD Elements drive properly. Running CHKDSK can repair these errors and restore normal access.
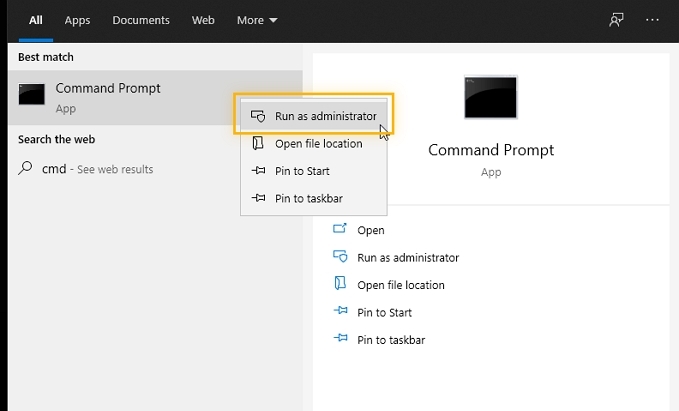
Step 1. Press Win + S and search for cmd. Right-click Command Prompt and pick Run as administrator.
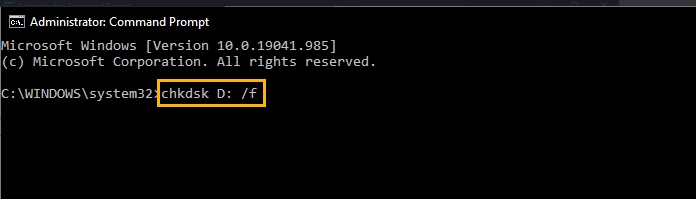
Step 2. Type this command. Replace E: with your actual drive letter: chkdsk E: /f /r. Then, press Enter. The /f flag fixes directory structure bugs. The /r switch scans for bad physical sectors and extracts readable data.
Tip: CHKDSK may take 30 minutes to 8 hours to complete, depending on the drive's capacity and condition. For a healthy 1TB drive, the scan may finish within a couple of hours, while repairing a 5TB drive with bad sectors can take much longer. Never disconnect the USB cable during the scan, as doing so may interrupt the repair process, cause further file system corruption, and reduce the chances of successful data recovery.
DIY Fixes for WD Elements Not Showing Up on macOS (Finder & Disk Utility)
Macs usually handle external storage fine. When a WD Elements external drive stays completely silent after you plug it into your Intel or Apple Silicon Mac, macOS is usually blocking the mounting process somewhere deep inside its storage software stack. Try basic settings before declaring it dead.
Fix 1: Check Finder Display Settings
Check Finder first. The drive might actually be mounted, but macOS hides external volumes from your desktop and sidebar. To show external hard drives on Mac, here is how.
Step 1. Open Finder.
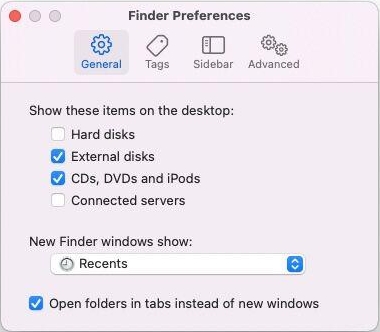
Step 2. Click Finder in the top menu bar, select Settings (or Preferences) and click the General tab.
Step 3. Verify that the box next to External disks is checked. Switch to Sidebar and check External disks under "Locations" as well. If it was unchecked, your drive icon should pop up immediately.
Fix 2: Force Mount in Disk Utility
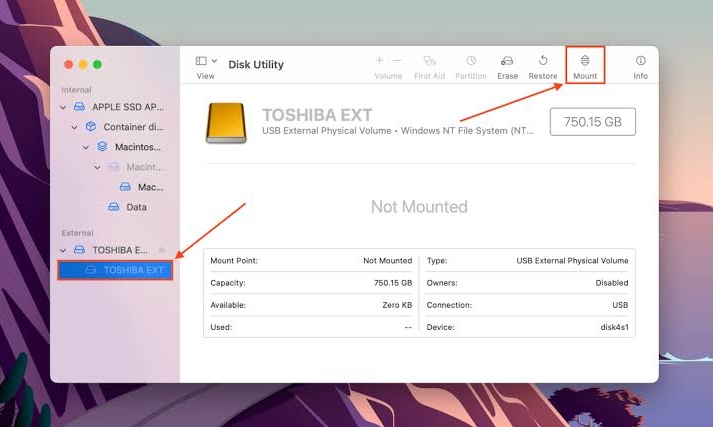
If your WD Elements drive appears in Disk Utility after connecting but is listed under an unfamiliar name or its volume is grayed out, you may think the drive is not recognized by your Mac. In fact, macOS has detected the physical drive but failed to mount the file system automatically. This may happen due to file system errors, improper disconnection, or temporary mounting issues. Right-click the grayed-out volume and select Mount. Then, you will find your drive accessible again.
Fix 3: Run First Aid
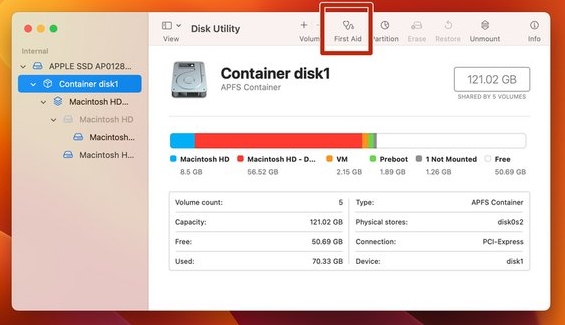
First Aid checks the disk structure and file system for errors. Start with the volume level because it contains your actual files, then move to the parent container or physical disk if needed.
- Select the nested volume under your WD Elements entry.
- Click First Aid in the top toolbar. Hit Run.
- Wait for the scan. If it passes, select the parent container or physical disk and run First Aid again.
- Stop on "File system check exit code is 8". That error means the directory structure is corrupted and running more repairs risks overwriting files.
Fix 4: Update Third-Party NTFS Drivers
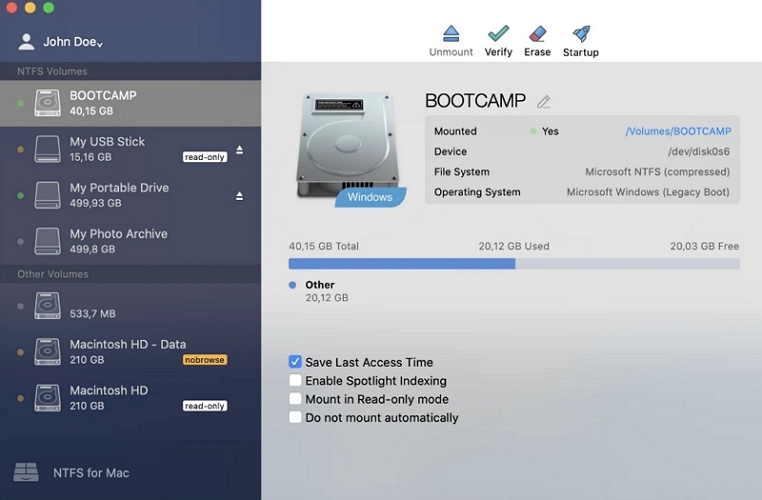
WD Elements drives are often formatted as NTFS for Windows users. While macOS can usually read NTFS drives, third-party NTFS drivers are required for write access. If you installed third-party NTFS software such as Paragon NTFS or Tuxera NTFS, a major macOS update may cause compatibility issues with older driver versions. In some cases, these drivers may prevent the NTFS volume from mounting properly, making the WD Elements drive appear missing in Finder even though macOS detects the physical device. So, check your NTFS software for compatible updates after upgrading macOS.
When to Stop DIY Fixes and Use Professional Data Recovery
Know the line. File system corruption is one thing, but hardware failure is a completely different monster. Swapping drive letters or updating drivers will not fix broken hardware. In fact, keeping a physically degrading drive powered on while attempting software fixes is the single fastest way to destroy your data beyond recovery.
Unplug it immediately if you catch any of these physical symptoms:
- The Click of Death: Ticking, grinding, or rhythmic clicking coming from inside your WD Elements enclosure. That's hardware death.
- System Freezing: Windows File Explorer or macOS Finder locks up the moment you plug the USB cable in, returning to normal only after you pull it out.
- Read Speeds Dropping to 0 KB/s: Transfers start fine, crash to zero within seconds, and leave the drive unresponsive.
- Disappearing in Disk Management: The drive shows up as "Unallocated" or "Not Initialized" for a couple of seconds before dropping off the device list completely.
That is mechanical failure. Software cannot fix broken metal. At this point, stop running repair tools and consider sending the drive to a professional data recovery service. A legitimate recovery lab provides a free evaluation and won't charge a dime unless they successfully extract your files.
The cost of professional data recovery varies depending on the type of damage. Simple logical recovery may cost around $300 to $700, while mechanical repairs that require cleanroom work, such as replacing damaged components, can range from $700 to $2,000 or more. Before approving any service, ask for a detailed quote and make sure there are no hidden fees.