


You bought a NAS to keep your data safe — family photos, work files, backups, and everything else you can’t afford to lose. But what if you lose data on it? You could have deleted the data by mistake. Or the files got corrupted. Or there was physical damage.
No matter what caused the data loss, here are all the NAS data recovery methods you can use to bring your data back.
NAS Data Recovery: Which Way Is Best for You
Not every data loss situation requires the same recovery method. The best NAS recovery option for you will depend on what happened to your NAS. For example, recovering an accidentally deleted file is much simpler than recovering data from a failed RAID array.
The table below compares all available recovery methods side by side. You can take a glance and choose the one that best matches your situation.
No RAID expertise required. 30 minutes to several hours High, especially if you stop using the drive before new data overwrites it.
Leave it to the experts. Several days to weeks Your best option for severe hardware damage, although success depends on the extent of the damage.
6 Ways for NAS Data Recovery
Once you've identified the most suitable recovery method for your situation, follow the step-by-step instructions below. If it doesn't work, move on to the next option.
Way 1. Retrieve Data from Recycle Bin
Most NAS operating systems, like Synology DSM, QNAP QTS, and others, come with a built-in network recycle bin. On Synology, for instance, this option is enabled by default whenever you create a shared folder. So any file you manually delete will land there first instead of disappearing permanently.
There are a couple of catches, though. Recycle Bin works per shared folder, not system-wide, so it can only recover files from folders where it's actually turned on. Also, every NAS system has different retention rules. For instance, some NAS systems hold onto deleted files for up to 30 days. Others skip keeping large files, like big video files, entirely, just to keep the drive from filling up.
Steps to Recover NAS Data from Recycle Bin
Step 1. Log in to your NAS web interface. For Synology, open DiskStation Manager. Make sure you have read/write or administrative permissions.
Step 2. Open File Station (or the File Manager). This will bring up the complete network directory tree.
Step 3. Navigate to the shared folder where the missing data originally lived.
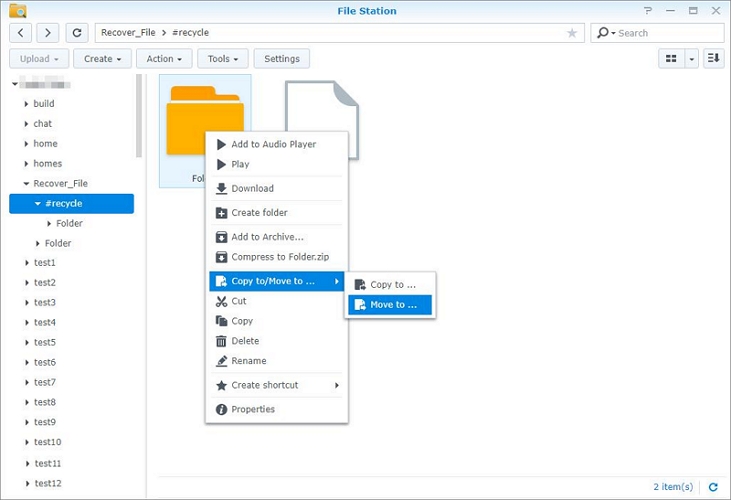
Step 4. Look for a subfolder named #recycle sitting at the root level. Open it.
Step 5. Select the files you want back. Drag them to the original location, or right-click and choose Restore (or Move To) to place them in another folder.
Way 2. Restore NAS Backup
Almost every NAS system comes with an automated backup running. Many people opt for backups during the initial setup itself and then forget about it. So if you have a backup, you could get your lost files back.
Where your backup lives, and how long it sticks around, comes down to your NAS brand. Here's how the three most common ones stack up:
C2 Cloud: 11 versions total — one a day for the last week, one a week for the last month.
You can verify whether you have a backup by checking your installed applications: you’ll have a backup program associated with your NAS brand. For instance, if you use a Synology NAS, look for the Hyper Backup app in your dashboard. You could also call customer support and ask them to verify what is in your recovery plan.
If a backup exists, you can follow the steps given by them to restore your data. Here's an example of how to do that using Synology's web interface and Hyper Backup.
How to Recover NAS Data for Free
Step 1. Open Hyper Backup.
Tip: If you’re running more than one backup task, select the one you want to restore from.
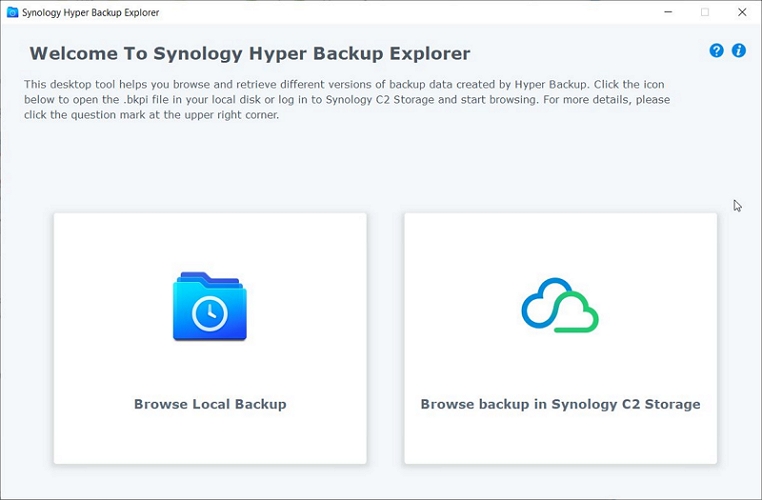
Step 2. Click the Version List icon at the bottom of the screen. This will show every available backup and its date.
Step 3. Find the date you need, then click the hourglass icon next to it to open the Backup Explorer.
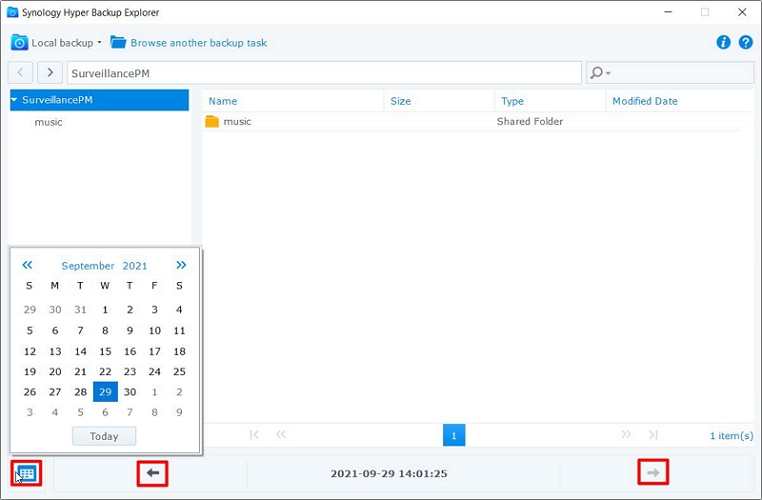
Step 4. Browse directly if you know where the wanted file lives. Use the directory tree on the left or search for it in the box at the top right.
You can also jump to a different backup date anytime using the timeline at the bottom—each white dot marks a version.
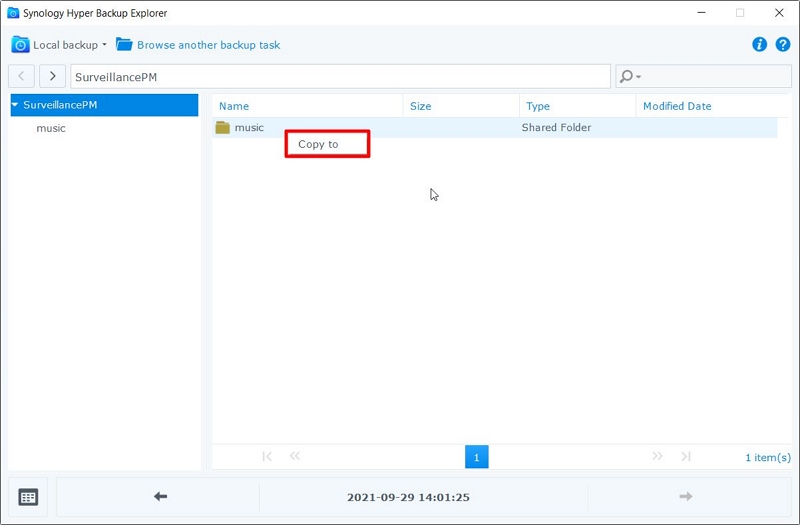
Step 5. Click the file to select it. You'll get three options: Copy To, Restore, and Download.
You can use one to recover the data in a new folder or the same folder.
Way 3. Use NAS Data Recovery Software
NAS data recovery software, like Eassiy Data Recovery, lets you recover deleted files from your NAS, even when you don’t have a backup running. It can also recover data if files disappear after an update or your NAS won't boot.
That's because deleted data on your NAS systems isn't actually gone. It still stays on the drive until something new overwrites it. It's just not accessible to you anymore. So you can still recover the data using Eassiy.
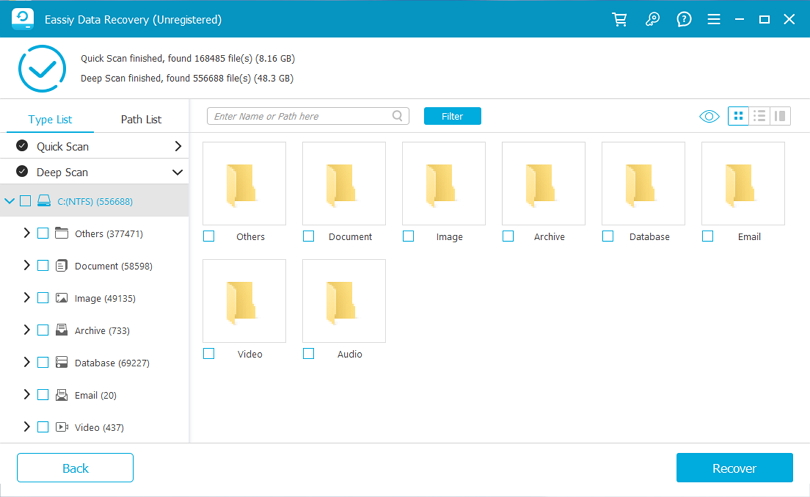
Eassiy Data Recovery scans the storage drive sector by sector. That is, Eassiy will read the raw data directly off the physical drive. After that, it will display what it finds on the drive and sort it into neat categories: photos, videos, documents, audio, email. So you can quickly pick the most important category you need and bring back the file. It’s worthy mentioning that Eassiy works with both single-drive and multi-drive NAS setups, including software and hardware RAID configurations.
Steps to Recover Data from a NAS
Step 1. Power down your NAS. Remove the drive and connect it to your computer with a SATA-to-USB enclosure or docking station.
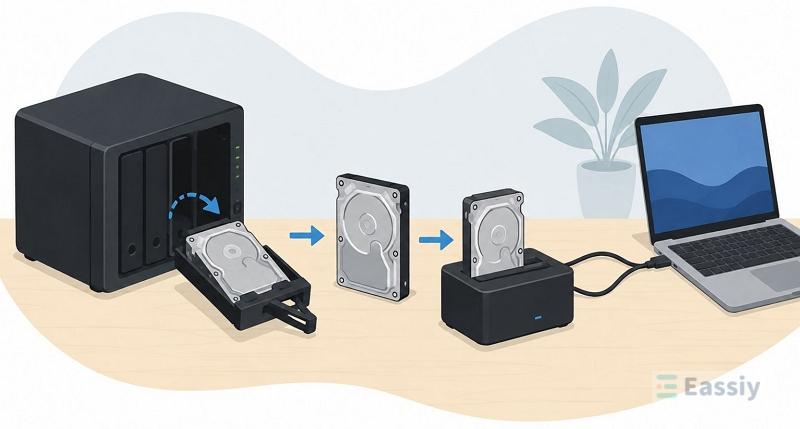
Step 2. Open Eassiy Data Recovery. Your connected drive will show up in the device list. Select it and hit Scan.
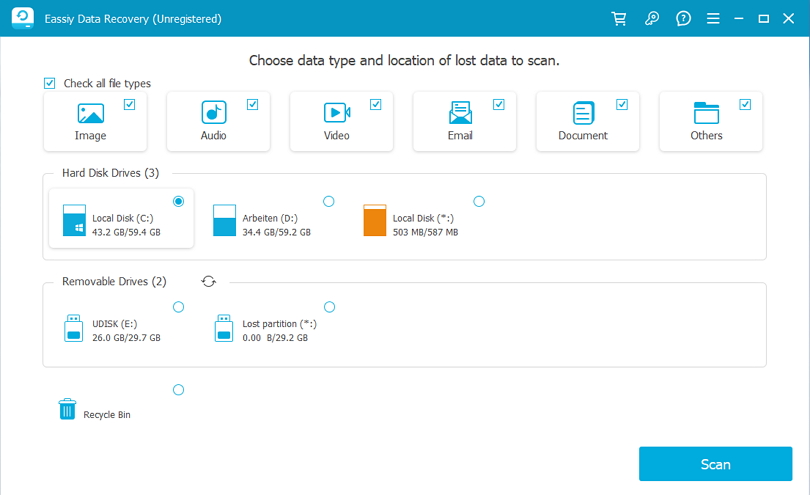
Step 3. Pick your scan mode.
- Choose Quick Scan for a simple deletion.
- Choose Deep Scan if the drive was formatted or shows corruption.
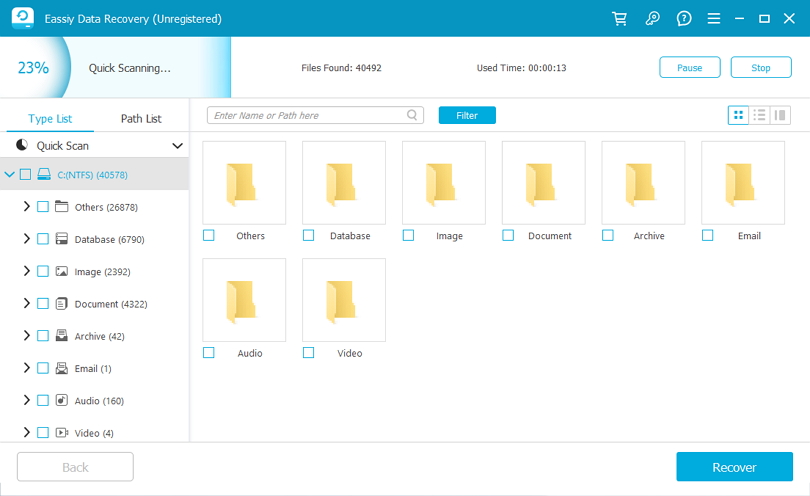
Step 4. Once the scan finishes, Eassiy will group the results by type — Image, Video, Document, and so on.
You can browse the category you need, preview the files to confirm they are the right ones, check the boxes and click Recover. You can save them to a different drive.
Tip: If you're on a Synology NAS, Synology also has an official guide on recovering data from a DiskStation using a PC — worth a look if you'd rather work with their own tools first.
Way 4. Roll Back to Snapshot
Snapshots are like time machines built into your NAS. They simply capture a previous version of your files at a specific point in time. So if your files are modified, overwritten, or deleted, you can restore the affected files or entire folders to that earlier state.
However, this can only be used in some situations. In most cases, snapshots are stored on the same drive. So if your hard drive itself has physically died from water damage or fire, you will lose both your files and the snapshots. That’s why snapshots are not as reliable as backups, which are a stored copy of your files on a different storage device altogether.
All major NAS brands offer this feature inside the operating system. However, you must configure your storage with a snapshot-supported file system, like BTRFS or ZFS, during the initial setup itself.
How to Restore NAS Snapshot
Here is an example using Synology Snapshot Replication.
Step 1. Log into your NAS dashboard. Launch the Snapshot Replication app.
Step 2. Head to the Recovery tab on the left sidebar. This will pinpoint the shared folders containing your corrupted data.
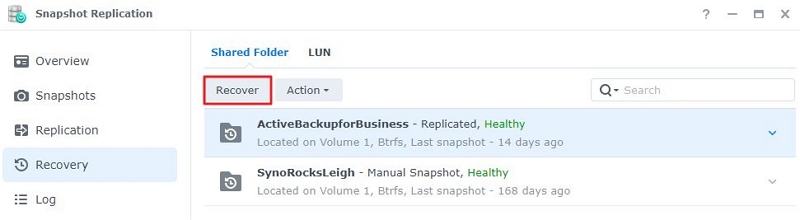
Step 3. Select the Recover option. This will bring up the visual timeline of your available snapshots.
Step 4. Browse the calendar for a timestamp from before the incident happened. You can use the browse feature for this.
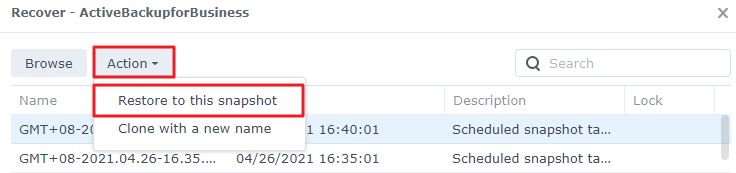
Step 5. Right-click to select the action and then select Restore to this snapshot from the drop-down. You will see a confirmation message. Simply click OK to confirm.
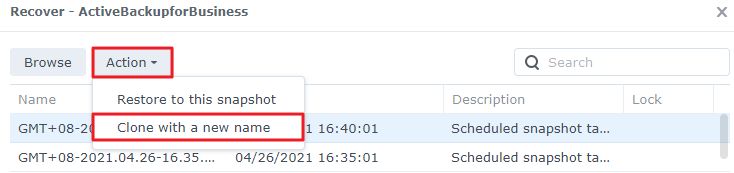
Note: You can also create a snapshot to a new shared folder. For this, choose Clone with a new name and enter the name of the clean-shape folder. Click OK to finish.
Way 5. Rebuild RAID
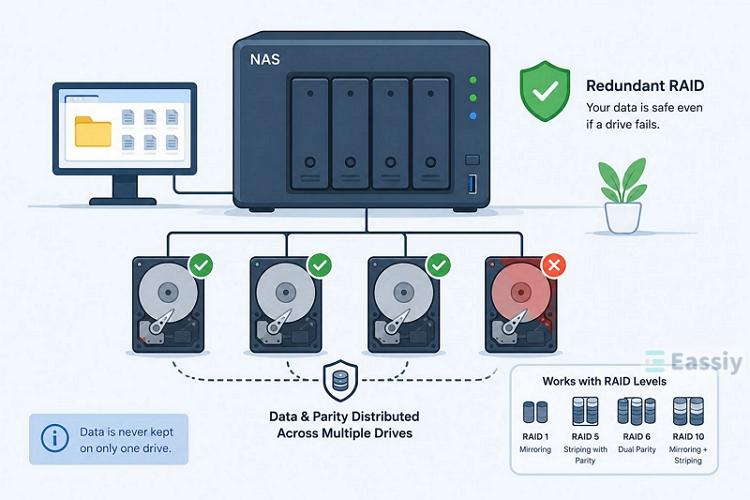
This one is different from every other method on this list. The ones above help when your data is deleted, overwritten, or encrypted by something. RAID rebuild deals with a drive that just died. If your NAS is throwing failure warnings or one drive is gone, you can rebuild the RAID drive. This will make the NAS work and allow you to access the data again.
Also, this only works when your NAS runs on a redundant RAID level — RAID 1, 5, 6, or 10. That means your data is never kept on only one drive. These configurations distribute data and parity information across multiple drives. So losing one drive does not mean losing your files.
Steps to Rebuild a Degraded RAID
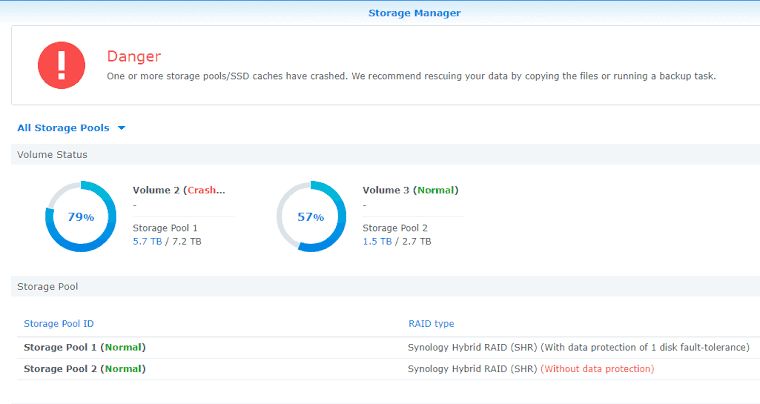
Step 1. Open Storage Manager to confirm which drive failed. Your dashboard will flag it red and the unit itself may start beeping.
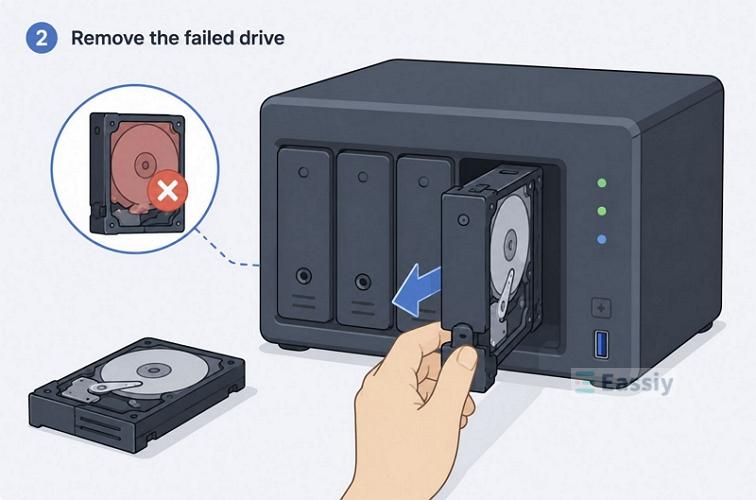
Step 2. Remove the failed drive.
Note: Not every NAS system supports hot-swapping — pulling a RAID drive while the system is running. This varies even within the same brand's own lineup. Also, there are plenty of documented cases where users lost the entire array during hot-swapping. Look up your exact model's manual before deciding whether to swap live or power down first.
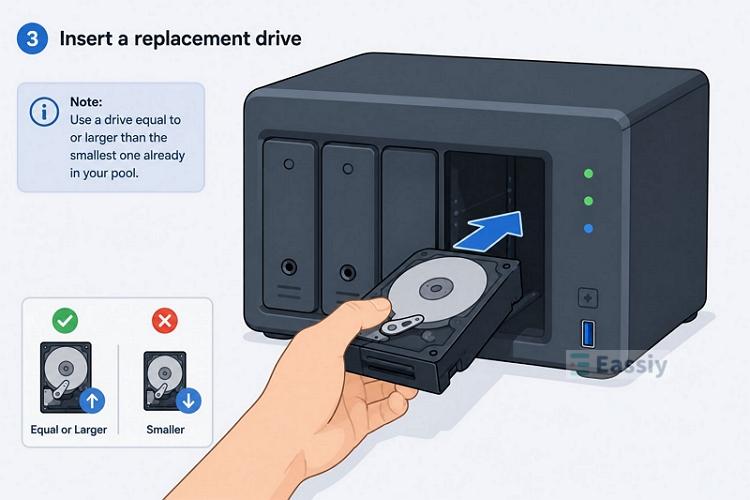
Step 3. Insert a replacement drive.
Note: Use a drive equal to or larger than the smallest one already in your pool.
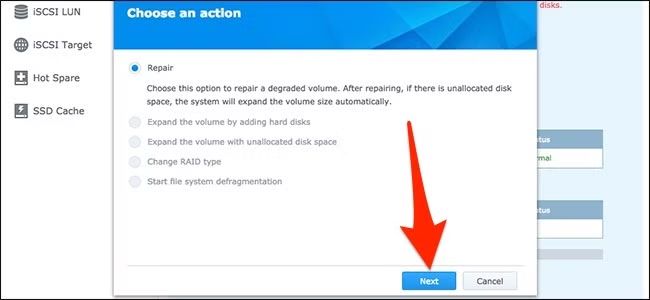
Step 4. In Storage Manager, select the degraded pool and choose Repair. Assign the new drive when prompted.
Step 5. Confirm the warning. The new drive will be wiped, then let it rebuild.
Depending on the size of your pool, rebuilding the RAID drive can take hours. Once it's done, the pool status will return to Healthy, and the data on that degraded drive is safe again.
Way 6. Use Local NAS Data Recovery Services
Every method up to this point needed your NAS to still be functional. The drive had to spin, the system had to boot, so that software could actually read what was left and pull your files back. That's fine when you're recovering something deleted or corrupted.
But what if your drive itself has been destroyed? At that point, a local data recovery service is your only real option. These run ISO-certified clean rooms, where technicians can safely open a hard drive, physically transplant components between drives, repair corrupted circuitry, and reconstruct your data byte by byte.
You can find trusted local and national data recovery services here.
FAQ: How Much Does It Cost to Recover NAS/RAID Data?
There is no single flat price. It depends entirely on what went wrong:
- Free or low-cost recovery is possible if you act quickly and your NAS is still functional. For instance, you can check the Recycle Bin. These cost nothing if you’ve set them up earlier.
- Software recovery using Eassiy Data Recovery will cost around US$39.99. You just have to pay once to own the license. After that, you can recover as much data as you want. And it doesn’t matter the cause of the data loss—manual deletion, formatted drives, or corrupted volumes, the cost will remain the same.
- Single drive replacement in a redundant RAID setup will cost US$200 to US$400 for the new drive. The rebuild itself is free.
When there have been multi-drive failures, head crashes, water damage, fire damage, or other serious situations, you will have to opt for professional clean room recovery. The cost for this will start at US$1,000 and can climb to US$10,000 or more.
Final Words
We’ve discussed all the available NAS recovery methods. You can pick the one most suitable for your situation. In summary:
- If you just deleted files, check the Recycle Bin on your NAS or restore from backup/snapshot right away.
- If your array has physical issues (failed disks, RAID offline), follow the RAID rebuild steps or consult professionals.
- If you don’t have any backup option running and have to recover deleted or corrupted data, use Eassiy Data Recovery first – it’s fast and economical.